SO, LET ME START BY SAYING THIS,
If you don’t have the tools and aren’t willing to invest in them, borrow or rent them, don’t install your cabinets. It would be like painting a room but not wanting to buy a good brush and roller and complaining bad it looks. The right tool for the job! You can always sell them or be the cool person that has the tools to loan to all your friends that now want to do their kitchen cabinets since you made it look so easy and got such excellent service and awesome cabinets from two cabinet guys (cheap sales plug inserted because I can)
😊
😊
YOU CAN STILL SAVE CONSIDERABLE AMOUNTS OF MONEY BY PURCHASING THE CABINETS YOURSELF AND HIRING SOMEONE TO INSTALL THEM.
SOME OF THE BASIC TOOLS NEEDED;
|
|
OKAY WHAT’S FIRST, MARK UP THE WALLS.
Remember when you were a kid and wanted to draw on the walls, well, here’s your chance, and you won’t get in trouble. First, mark the center location of the studs (generally 16 in. On center), and I can’t express enough that a good stud finder is your friend. You should mark the stud location in a few spots from top to bottom, then draw a straight line with a level. At this point, it is also important to mark with a big red x where not to put screws into the wall where there is plumbing, electrical, gas, vent pipe, or anything you don’t want screws going through. Just because there might not be kitchen electricity or plumbing in that wall doesn’t mean there isn’t anything going up to the second floor, possibly a bathroom above? And remember, most of this writing will be covered by the cabinets. If you need a constant reference, write where your backsplash is going on the wall since you will see that even after the cabinets are installed.
FIND THE HIGH SPOT ALWAYS TRY TO INSTALL THE CABINETS AFTER
THE FLOORING IS in place.
So, with that said, the first step in laying out the cabinets is to find the high spots; this is where the importance of a laser level comes into play. When I say laser level, I'm not talking about a straight line from a level. I am talking about one that shoots a line 360 degrees around the room. You will set up your laser level in the middle of the room. Then measure up a mark 34 ½" Up from the floor and set the laser on that line. I take a piece of scrap wood or a broom handle, put a piece of blue tape on it, and mark up 34 ½" With a black Sharpie. Then I slide it along the floor against the wall and look to see if the laser drops below the line. If it does mark the wall at that point, raise the laser line to that mark, and keep going until you go everywhere the cabinets will be. The highest mark will be your high spot. Make marks all around the room where the new laser line is and draw a straight line with your 6-foot level or snap a chalk line on the drywall around the room to mark the top of the base cabinets, and this is now the mark of the top back of the cabinets.
RAISE THE CABINETS TO THE FLOOR HEIGHT.
If the kitchen flooring is going to be hardwood or tile, and you're installing it after the cabinets, or you're not replacing the floor, and there is no floor where the cabinets are going. You'll have to raise the cabinets to the floor height, or the dishwasher won't fit under the countertop. At minimum, install plywood to raise the lower cabinets to the height that the floor will be, and then mark your lines. Again, once you find the high spot and draw your line or snap a chalk line, measure up 19 ½" from that line, reset your laser to it, and draw another line for the bottom of the upper cabinets. Wall cabinets are 54" From the high spot on the floor to the bottom of the upper cabinets.
ALL THAT SAID.
If you have a soffit, then that’s going to determine the maximum height of your upper cabinets. Not saying you push the uppers to the top, it’s just the maximum you can go, so the distance may be less between the uppers and lowers. I have seen many times where the cabinets don’t go up all the way, and there is a piece of crown molding covering the opening between the two.
A HANDY HELPER TO SUPPORT THE WEIGHT OF THE CABINET.
Use a cleat and save your back! Installing kitchen cabinets is usually a two-person project. Depending on how confident you are hanging your upper cabinets or how much experience you or your helper have, you may want to screw in a temporary 1x3 or 1x2 piece of wood as a support rail into the wall, aligning the top edge of the rail with the line for the bottom edge of the wall cabinets.
Attach it by driving three or four 2 in—screws through the rail into the wall studs. Don't worry about holes in the wall; you can fill these before you put the backsplash up. This way, you just put the bottom back of the cabinet on top of it, and at least you know the cabinet is level on the bottom, and even though it can fall forward, it's not slipping and sliding all over the wall.
Now label the location of all the cabinets and appliances on the wall. It doesn't have to be detailed but just hand-drawn marks, so you know what's going where according to your drawing, and you'll notice if a cabinet doesn't belong. One trick is to mark the cabinets on the drawing b-1, b-2, w-1, w-2, etc. For base-1 base-2 or wall-1 wall-2, and so on, then each cabinet, when you get them, put a piece of blue tape on the back of each and mark the same mark and on the kitchen walls also. This way, it is one less thing you must worry about, and you won't be double-checking a piece of paper constantly. Trust me; this speeds up the process.
The Chicken or the egg? Uppers or lower? As a long-time debate by installers, there is no right or wrong answer. Whichever you install first matters on the kitchen and cabinet layout, the uncommon situations at hand, and your preference.
One thing for sure is that you should always remove the doors and drawers from all your cabinets. For one, this will reduce the weight considerably, and for two, you won't bang them up when installing them. Most doors and drawers must be removed to attach one cabinet to the other. Remember the cabinet coding I mentioned earlier to know which cabinet is which? Now your blue tape comes in handy. Put a small piece on the inside of the door or drawer, and mark the cabinet to which it belongs. And do not stack and lean all these pieces on top of each other, or you'll be using that touch-up marker and wax fill stick you bought to fix them.
NOW WHAT? WHERE DO I START HANGING?
START AT THE CORNERS (WELL, KINDA, MOST OF THE TIME)
If a sink cabinet must center on a window, lay that out first; otherwise, start at the corners and work outward. You will use filler strips to make up for any spacing adjustments, which will be noted in your design layout. You will also use fillers or scribe at the base and wall end cabinets to make up for irregularities and any slight out-of-plumb condition.
If the corners are out of square, or if either of the end walls aren't plumb, you will need to adjust the location of the base cabinets. A corner that's only slightly greater than 90 degrees usually means you can put the back of the corner cabinet up against one wall—often the longer wall—and make up for the out-of-square condition at the back of the countertop on the short run of cabinets. If the corner angle is slightly less than 90 degrees—or if the end wall is leaning in at the top—you will still try to place the back of the cabinet against the long wall. Still, we'll need to hold it in from the short wall enough to make sure the wall cabinets align with the base cabinets on the long wall and that the cabinet fronts on the short wall can then be aligned without having to shave the drywall (yes that's an option).
If your cabinet setup includes a corner wall cabinet, install it first with a helper. Put the cabinet in place, and it should already be level from left to right because of the cleat you installed earlier. With your short level, see how level it is front to back and shim accordingly. Drill pilot holes through the sturdy cabinet back or its support rail.
Screw the cabinet to the wall using two screws that are long enough to penetrate the studs by at least 1 ½" and then re-check the top for level and the front edge for plumb. To correct the position, back off the screws, tap shims behind the cabinet at stud locations, and then drive the screws into where they touch the cabinets, do not crank them in as far as possible, as you will risk crushing the wood or making the cabinets out of square. It's like turning off a faucet as hard as you can. There is no reason for it, as cabinet screws have their purpose, and they do it well. Add a few more into each stud for secure attachment.
Let's discuss drilling and screwing further since many people don't understand how it works. Say you have two pieces of wood you want to screw together. If you put them together and put a screw through them. Have you ever had the bottom one push away from the top one, and if you keep screwing, it doesn't pull them together tight? Here is the reason your technically not screwing them together. To properly accomplish this, you need to drill a hole (pilot hole) through the first board that's about the same size, if not a little bigger than the screw going in it. Then depending on what you are screwing into, a smaller hole into the second piece if you're worried about cracking it and how big the screw is. What this does is the screw goes through the first board with ease, then the threads grab the second board, and once the screw head seats against the first piece of wood, it pulls the second one close and tight. Same with the cabinets, you want the screw pulling the cabinet to the wall, not pushing it away.
THAT WAS EASY; NOW WHAT?
CLAMP, DRILL AND FASTEN (THIS IS ALSO WHY WE REMOVED THE DOORS AND DRAWERS EARLIER)
Now you will install the next cabinet, one more time because I know most of you didn’t listen so if you haven’t done so, remove the doors and drawers to the cabinet. Install the cabinet as described earlier but you’ll be using your 4-6’ level to make sure they are level across each other, and in also you’ll be connecting the two by the face frames.
When connecting two cabinets, line up the face frames and clamp them together. Both cabinets should be fastened to the wall at this point, but you may have to loosen one cabinet or the other to get the frames to line up perfectly. Now the optional face frame clamp comes into play. It clamps from side to side and pulls the fronts together flush, and it also has a hole in the side of it to center and guide where to drill the pilot hole to pull the cabinets together. Predrill a 1/8" hole before screwing them together with a 2 ¼" face frame screw. Choose the less noticeable cabinet of the two for drilling and placing the screw head.
When connecting two cabinets, line up the face frames and clamp them together. Both cabinets should be fastened to the wall at this point, but you may have to loosen one cabinet or the other to get the frames to line up perfectly. Now the optional face frame clamp comes into play. It clamps from side to side and pulls the fronts together flush, and it also has a hole in the side of it to center and guide where to drill the pilot hole to pull the cabinets together. Predrill a 1/8" hole before screwing them together with a 2 ¼" face frame screw. Choose the less noticeable cabinet of the two for drilling and placing the screw head.

|

|
|
|
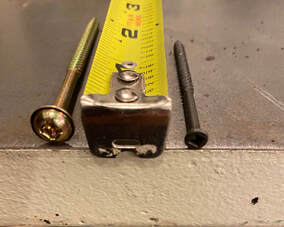
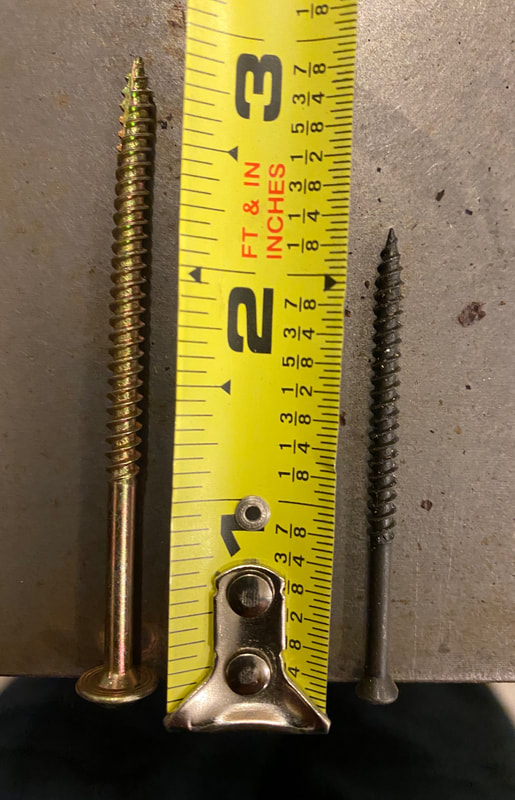
Face-frame Clamps Cabinet screw left Face-frame screw right
THERE’S A GAP!
Don't sweat the little gaps. Use the cabinet filler strips that came with your order. All cabinets come with a scribe, or filler pieces, for where the kitchen cabinets meet the wall at minimum to keep the drawers and doors a little away from the wall, so all the moving parts in the kitchen don't touch the wall. Make sure you install the fillers in sequence according to your drawing, you place them according to the plans and you install them just like it’s another cabinet, use your clamps, make them flush and predrill.
Clamp the filler onto the cabinet flush with the inside of the vertical rail. If you must cut it to size and most likely you will since they come standard in 3" Or 6" Widths, use blue tape or masking tape on the filler strip as this helps the pencil line show up better and protect the finish from the saw table. Most walls are not straight, so these also allow for a neat finish where any contours in the wall show up.
Clamp the filler onto the cabinet flush with the inside of the vertical rail. If you must cut it to size and most likely you will since they come standard in 3" Or 6" Widths, use blue tape or masking tape on the filler strip as this helps the pencil line show up better and protect the finish from the saw table. Most walls are not straight, so these also allow for a neat finish where any contours in the wall show up.
SECURE CABINETS TO THE FLOOR FOR KITCHEN ISLAND INSTALLATION.
Cabinets that makeup islands and peninsulas should be secured to the floor, especially if there is electric and or plumbing in your island. Join the island cabinets and set them in place. To begin kitchen island installation, first trace an outline of the cabinets on the floor. Screw 2x2s to the floor ½" on the inside of the line to account for the thickness of the cabinets. Anchor the island cabinets to the 2x2s with screws. If needed, place flooring blocks under the 2x2s.
HOW TO INSTALL KNOBS AND PULLS.The location of knobs and pulls isn’t written in stone, but there are some standard practices. One good rule of thumb is to line up a knob with the top of the bottom door rail. If you’re installing door pulls, line up the bottom of the pull with the top of the door rail. Always center them on the door stile. I recommend either purchasing a jig or making your own for consistency will minimize mistakes. This is the end of the project, the last thing you want is an “oops” by drilling a hole in the cabinet where one doesn’t go and will be visible. Here is a picture of my new favorite tool for installing knobs and pulls that a good friend of mine got me.
|

|
PREPARING FOR A FARM SINK.
Farm sinks, also known as farmhouse sinks or apron front sinks, are trendy in colonial and traditional style kitchen designs. In addition to their unique look, farm sinks differ from most other sinks in the way they are supported. While some sinks get placed in a hole cut into the countertop, farm sinks slide into an opening underneath the countertop and above the base cabinet. A farm sink is supported solely by the base cabinet it rests on, rather than using the countertop as support like with a drop-in sink.
Since farm sinks can be tricky to install, our kitchen designers have provided a few helpful tips to guide you through the proper installation of a farm sink when used in conjunction with a farm sink cabinet.
Before selecting your farm sink cabinet, it is good to have the sink you intend on purchasing in mind as you will need the specifications to see if it will work and what modifications will be required.
In general, you will want to go with a sink that is 3" smaller in width than the cabinet you choose. By going smaller, you will have cabinet trim on each side of the sink. Having trim ensures that if your sink is not its exact width (cast iron/porcelain/copper sinks aren't always accurate), it is still within the cabinet width. Additionally, it will not leave a visible gap between the end of the sink and the dishwasher. It is common to add 1-1/2” dishwasher side panels on each side of the cabinet to create the necessary trim as needed.
Customizing the cabinet to fit your sink should be left to the installer or custom fit when you order the cabinets.
no shame in hiring someone.
If this job looks a little too complicated or involved, be aware that many dealers offer installation, either by their personnel or by independent installers. When you order your cabinets, ask for estimates and/or referrals. The job usually goes a bit smoother if you hire a cabinet installer who is familiar with the product you’re purchasing. Make sure to ask the installer for references. Another option is to install the cabinet boxes yourself and hire a finish carpenter or cabinet installer to handle the trickier jobs of mounting and adjusting the doors and drawers as well as for any unique trim work.
Installing new cabinets doesn’t necessarily require hiring a professional—but it does take a fair amount of do-it-yourself skills and necessary tools. The key is to install all the cabinets perfectly level and plumb—otherwise, the cabinets may look shoddy, doors and drawers may not close properly, and appliances may fit poorly. You’ll need at least one helper for lifting and holding cabinets in place during the fastening process.
Installing new cabinets doesn’t necessarily require hiring a professional—but it does take a fair amount of do-it-yourself skills and necessary tools. The key is to install all the cabinets perfectly level and plumb—otherwise, the cabinets may look shoddy, doors and drawers may not close properly, and appliances may fit poorly. You’ll need at least one helper for lifting and holding cabinets in place during the fastening process.
MISCELLANEOUS TIPS.
Color the edge of filler strips or anything you cut or trim to blend in, especially if you must cut to size.
Sink base install—measure for holes from the cabinet from left or right and from laser line down, never from the floor up! Also, account for ¼” for each face frame when you are measuring from the back and make the holes slightly larger than the pipe it is going around.
Mark and drill small pilot holes from the back of the cabinet, then by using the hole saw from the back, just to slightly cut into the wood until the center pilot bit comes through the inside of the cabinet. Then use the hole saw from inside of the cabinet to finish the hole. This way, you won’t tear out the back or inside of the cabinet and will have a clean cut.
Extras you will need- scribe, toe kick, accessory molding, wax stick, stain, touch up pen.
You should always have a filler or space at the end of a run that goes against a wall or an obstruction, this is so your drawers and doors can open properly.
Disclaimer: this is just a list of suggestions that may help you out with your cabinet project. It is in no way a complete guide on how to install cabinets or how you should install cabinets. It’s just little tips on how to do it from my experience, just my opinion and you know what they say about those.